

Quick Search for removing the dashboard. http://my.is/forums/2525841-post8.html
***Move your seats all the way back as your going to need the room to get around. Unplug your battery for atleast 5 mins prior to removing the airbag to keep it from going off in your face.
***The Airbag and dash can be painted seperate and they will match without a doubt.
These are the materials needed. All aquired from any local pep boys/Auto Zone
-600 Grit Sandpaper
-800 Grit Sandpaper
-Simple Green Cleaner or your choice of cleaner
-Wax/Grease Removal Spray ( I got a can of Prep It comes in a blue aerosol can)
-Rubber Gloves Non Powder
-2 Cans of Duplicolor Interior Vinyl Paint (http://i15.photobucket.com/albums/a374/wizkiddrummer/intpaint2016.jpg)
***Make sure you use the flat black not the gloss black. You will tell the difference by the color cap The one pictured in the googled image is gloss
-Kitchen scrub sponge
-Shop Towels (The blue ones i find best.)
-Bucket for water
Okay these instructions are all from memory but it is as accurate to get you through the job as anything.
[1]......With the dash removed bring it to the grass area or somewhere you dont mind getting all wet and what not. Scrub the dash down dont worry about scratching the old paint your goal is to get all the old crap off the dash so that you can bring it back to life. It must get ugly before better. Use a water bucket with the simple green mix in there and go to town.
[2]......Repeat if needed as many times to get all the areas cleaned up. Once you are done and ready take your shop towels and wipe the dash down. Keep your gloves on the intire time so that you dont transfer hand oils or finger prints to the dash.
[3].....Now go to the rough areas and this is where the sanding comes to place. Use the 600grit to get the areas around the glove box all the way around the radio face and up to the cluster area even it out and creating a new serface. After that come back over with the 800grit to smooth things out. You can go up to 1000 if need be but youll be fine with the 800.
[4].....Now using the Prep spray and the shop towels spray the dash down and wipe it all off and repeat till the dash is cleaned up of anything that is left over from sanding and cleaning. I would do this in the area your going to paint the dash as you dont want anything to fall onto the dash and be painted over or make your prep work worthless.
[5].....Painting... Now with the Duplicolor Flat Black paint spray the dash light coats. Dont worry about coating the whole dash in one spray. You want to create a base and build off that. Its going to take about 4 coats of light sessions to get it done. Repeat where needed. Youll see any areas that may need to be painted and/or sanded and thats where your going to start over yet just on that section alone.
[6].....Let it dry for a day before you mess around with it. Let all the paint cure and set in.
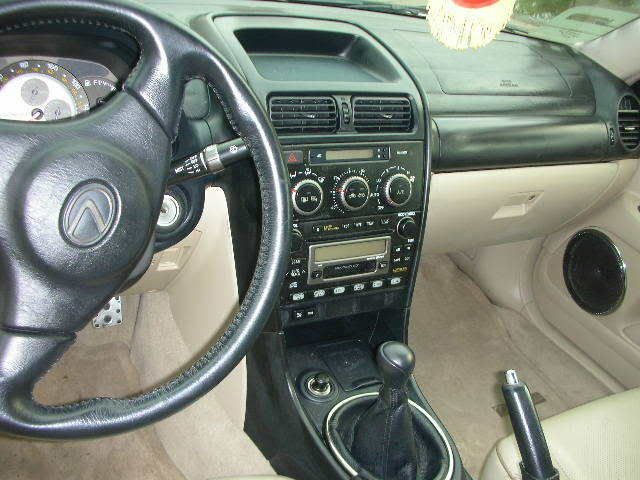
This is my Dash Prior.. Also know that iam still in process of doing my whole interior swap to black.
![Image]()
So far i have had this done for a year and nothing has gone wrong. Wipe it down just as you would normal dont use that leather wipe crap. Just wipe it down youll be fine. Also notice this can be done on all your dash pieces i did it on my glove box as well. Just sand prep and paint let dry and install.
***Move your seats all the way back as your going to need the room to get around. Unplug your battery for atleast 5 mins prior to removing the airbag to keep it from going off in your face.
***The Airbag and dash can be painted seperate and they will match without a doubt.
These are the materials needed. All aquired from any local pep boys/Auto Zone
-600 Grit Sandpaper
-800 Grit Sandpaper
-Simple Green Cleaner or your choice of cleaner
-Wax/Grease Removal Spray ( I got a can of Prep It comes in a blue aerosol can)
-Rubber Gloves Non Powder
-2 Cans of Duplicolor Interior Vinyl Paint (http://i15.photobucket.com/albums/a374/wizkiddrummer/intpaint2016.jpg)
***Make sure you use the flat black not the gloss black. You will tell the difference by the color cap The one pictured in the googled image is gloss
-Kitchen scrub sponge
-Shop Towels (The blue ones i find best.)
-Bucket for water
Okay these instructions are all from memory but it is as accurate to get you through the job as anything.
[1]......With the dash removed bring it to the grass area or somewhere you dont mind getting all wet and what not. Scrub the dash down dont worry about scratching the old paint your goal is to get all the old crap off the dash so that you can bring it back to life. It must get ugly before better. Use a water bucket with the simple green mix in there and go to town.
[2]......Repeat if needed as many times to get all the areas cleaned up. Once you are done and ready take your shop towels and wipe the dash down. Keep your gloves on the intire time so that you dont transfer hand oils or finger prints to the dash.
[3].....Now go to the rough areas and this is where the sanding comes to place. Use the 600grit to get the areas around the glove box all the way around the radio face and up to the cluster area even it out and creating a new serface. After that come back over with the 800grit to smooth things out. You can go up to 1000 if need be but youll be fine with the 800.
[4].....Now using the Prep spray and the shop towels spray the dash down and wipe it all off and repeat till the dash is cleaned up of anything that is left over from sanding and cleaning. I would do this in the area your going to paint the dash as you dont want anything to fall onto the dash and be painted over or make your prep work worthless.
[5].....Painting... Now with the Duplicolor Flat Black paint spray the dash light coats. Dont worry about coating the whole dash in one spray. You want to create a base and build off that. Its going to take about 4 coats of light sessions to get it done. Repeat where needed. Youll see any areas that may need to be painted and/or sanded and thats where your going to start over yet just on that section alone.
[6].....Let it dry for a day before you mess around with it. Let all the paint cure and set in.
This is my Dash Prior.. Also know that iam still in process of doing my whole interior swap to black.
So far i have had this done for a year and nothing has gone wrong. Wipe it down just as you would normal dont use that leather wipe crap. Just wipe it down youll be fine. Also notice this can be done on all your dash pieces i did it on my glove box as well. Just sand prep and paint let dry and install.


